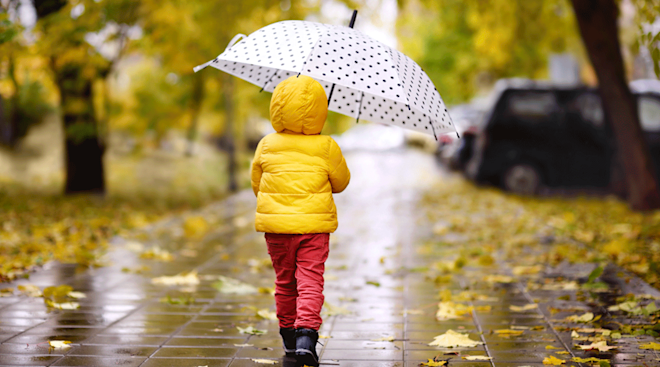


39 Frightfully Cute Toddler Halloween Costumes

Halloween has a way of sneaking up on us—boo! Whether you’re a DIY master or someone who just wants to toss something in your (online) shopping cart and be done with it, these toddler costume picks are sure to meet your spooktacular needs. To make your life easier this autumn, we’ve rounded up the best toddler Halloween costumes, from super-cute characters to slightly scary get ups. Then we went one step further and sourced real-life examples to inspire your hunt. Rest assured that when October 31st rolls around, you’ll be trick-or-treat-ready thanks to these toddler Halloween costume ideas that you and your kiddo will love. (Psst—shopping for younger siblings? Check out these adorable baby costumes as well.)
While picking out a Halloween costume with your child should always be fun rather than stressful, getting a little inspiration can help. So we’ve combed through the best Halloween costumes for toddlers from brands and retailers that we trust to find the sweetest and spookiest options out there. Here are the steps we took to create this article:
-
We asked our staff to tell us about the toddler Halloween costumes they dreamt up for trick-or-treating.
-
We did a deep dive into The Bump community forums to learn which toddler Halloween costumes are trending this year.
-
We considered how wearable they are, how warm, the size range, the material and, of course, how much fun your kid will have in them! We also made sure to read user reviews to see what real consumers have experienced when purchasing these costumes.
-
To see how these costumes worked for real families, we conducted exhaustive market research, scouring forums and message boards to find out what parents nationwide thought about when planning their toddler’s Halloween costume.
Editorial integrity is at the heart of everything we publish. Read about how The Bump develops and reviews all articles, including product reviews.
Toddler dinosaur costume
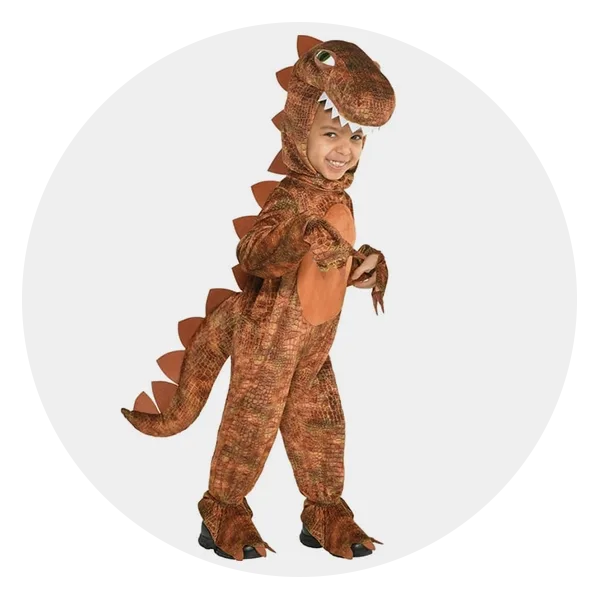
What kiddo doesn’t want to be a dino for a day—and let’s be real, probably many days after Halloween too? This has to be one of the best toddler costumes to double as dress-up play for months to come. A cool dinosaur-head hood and spikes all the way down to the tip of the tail really sell it, and both parents and kids will appreciate how you can wear clothes underneath to keep warm while trick-or-treating.
Size range: 3-4 years | Material: Cotton | Care instructions: Hand wash only
Aquatic witch costume for tots

The details on this two-piece toddler costume are absolutely bewitching. The classic witch costume is given an under-the-sea update, with silver seashell detailing and black tentacles that drape over a mystical purple skirt. Complete the toddler Halloween outfit with a shiny silver crown fit for an aquatic princess.
Size range: 1-3 years to 7-9 years | Material: Polyester | Care instructions: Machine wash, hang dry
Cute caterpillar toddler costume
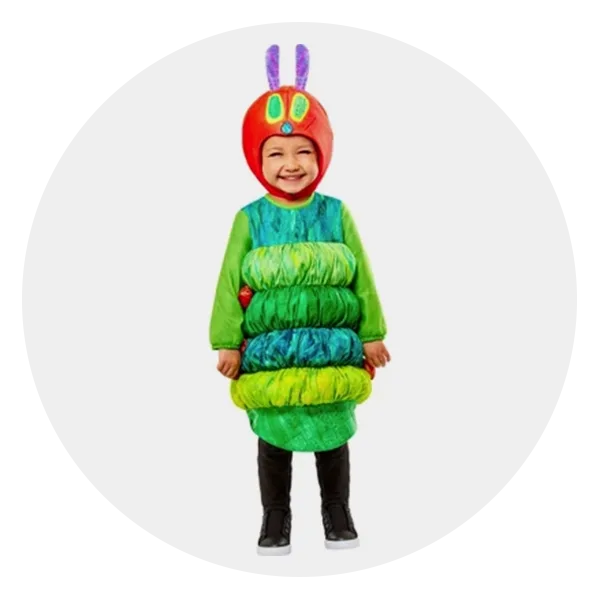
Let your child metamorphosize into a character they’ve known since they were a baby with this absolutely adorable Very Hungry Caterpillar costume. The photos are sure to be framing material.
Size range: 6-12 months to 2 years | Material: Polyester | Care instructions: Hand was, line dry
Ketchup packet toddler halloween costume
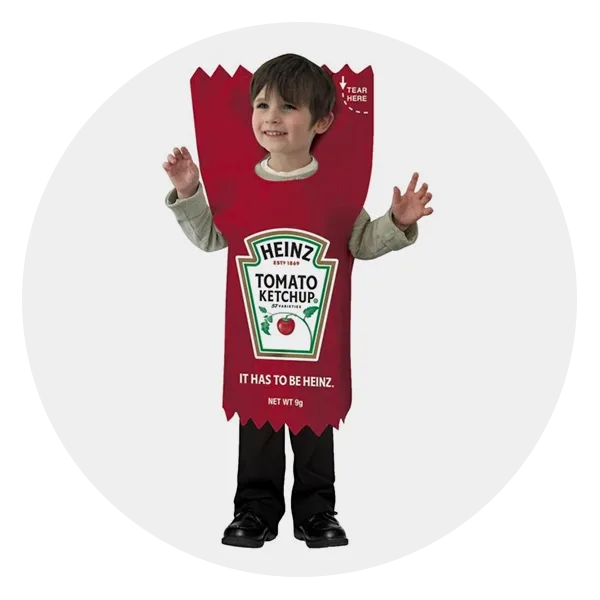
Is your child a picky eater? If they refuse to eat meals without this iconic condiment, this ketchup costume for toddlers is sure to make them smile.
Size range: 3T/4T | Material: N/A | Care instructions: N/A
Sweet deer toddler halloween costume
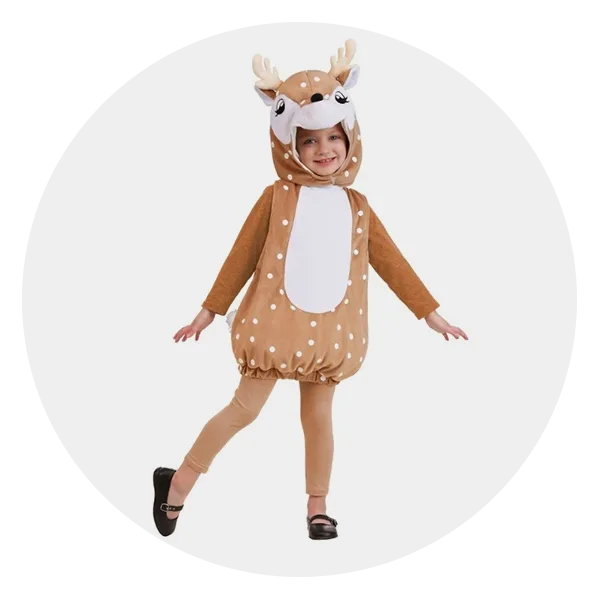
Your dear kiddo will look too cute for words in this whimsical, woodland Halloween costume for one-year-olds and older tots. With a plush, furry tunic and an embroidered headpiece, it’s everything a toddler could want.
Size range: 12-18 months to 4 years | Material: 100% polyester | Care instructions: N/A
Cookie monster costume for tots

Om nom nom––your kiddo will look cute enough to eat in this toddler Halloween costume! Whether they love Sesame Street, cookies or both, this fuzzy outfit is sure to win them over. As an added bonus, the costume’s eyes even light up!
Size range: 2 years to 3-4 years | Material: 100% polyester | Care instructions: Spot clean
Fun octopus costume for tots

When in doubt, go with a cute critter. While toddler animal costumes are ever-popular, less-thought-of animals like an octopus are a more creative choice. We just love the arms as tentacles on this adorable outfit.
Size range: 18 months to 4 years | Material: 100%polyester | Care instructions: N/A
Plush chicken halloween costume for tots
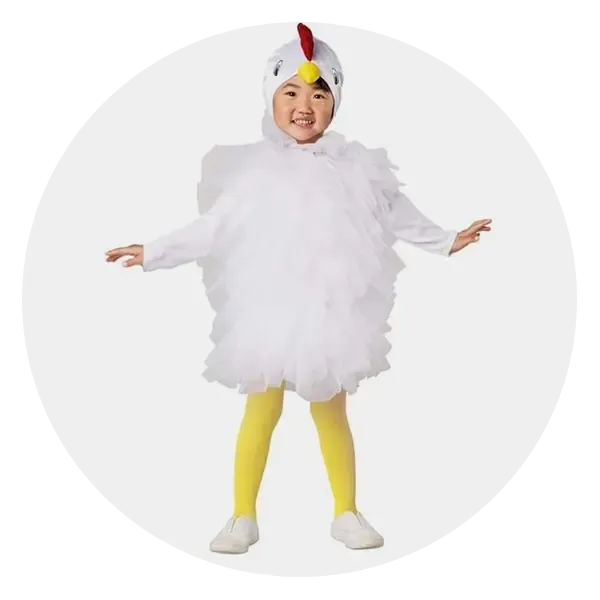
This is one of the best toddler Halloween costumes for admiring fans to cluck over. Passersby will flock to get a look at this funny chicken outfit. And why not get the whole family in on the farm animal fun? Someone could even be Old McDonald. E-I-E-I-O!
Size range: 2T/4T to M | Material: 100% polyester | Care instructions: N/A
Classic movie costume
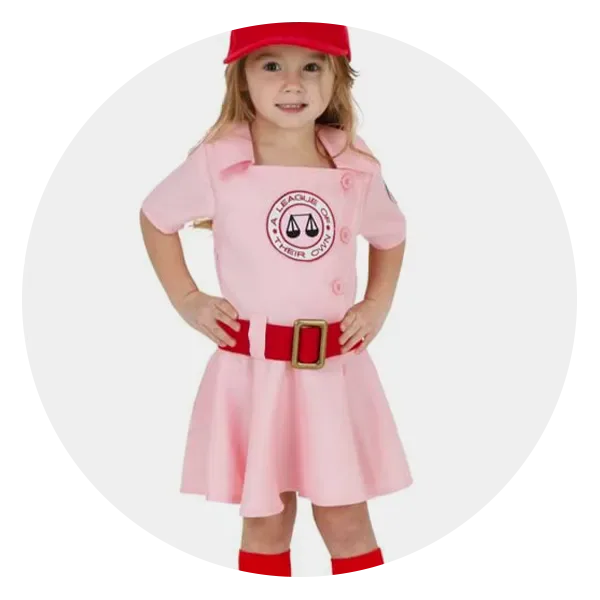
Your child will love the pink uniform with red accents and everyone in the neighborhood will smile as they walk by thinking of the heartwarming classic about Dottie and the first women’s baseball league. And if everyone wants to be in A League of Their Own, it’s a great opportunity for a family costume. Who knows, you may even get a tear free night, since after all, there’s no crying in baseball.
Size range: 18 months to 4 years | Material: 100% polyester | Care instructions: N/A
Train conductor toddler halloween outfit

All aboard! This is certainly one of the best toddler Halloween costumes for any railway lover. The train engine overalls will make your toddler want to zoom around the room with excitement—we’re even willing to bet they’ll want to wear this one way past October 31st.
Size range: XS to XL | Material: 100% polyester | Care instructions: N/A
Toddler werewolf costume
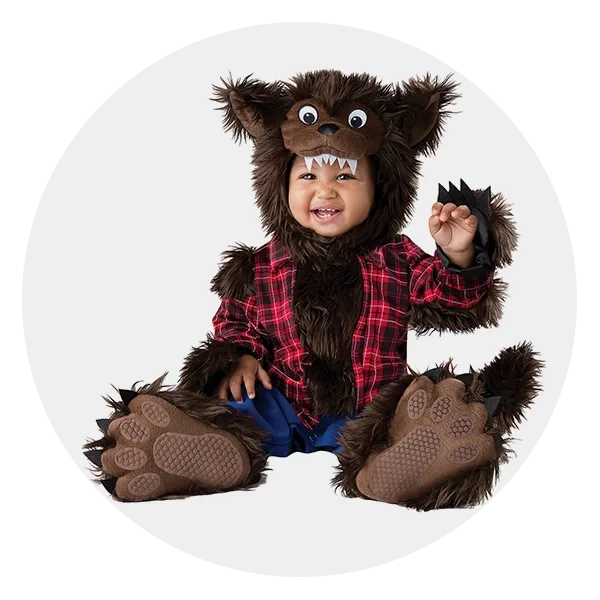
Your little one can have some major mood swings—just like the mythical werewolf. With its flannel shirt, fuzzy boots and furry hood, this cozy toddler boy Halloween costume will keep them warm all while looking fierce.
Size range: 0-6 months to 18-24 months | Material: 100% polyester fabric with faux fur | Care instructions: N/A
Dino explorer toddler costume

Can’t get enough funny toddler Halloween costumes? Check out this roar-some pick. Let your kiddo’s imagination soar as they ride along a dinosaur’s back with this clever costume idea. The adjustable straps make this Halloween costume ideal for a range of sizes.
Size range: 3T to 6T | Material: Polyester | Care instructions: Spot clean
Butterfly DIY costume for toddlers

Does your toddler love arts and crafts? If so, this DIY toddler Halloween costume is sure to be a hit. Just follow the kit’s straightforward instructions and use the provided materials to create a whimsical set of wings that your child can wear on Halloween.
Size range: One size | Material: Felt stickers and velvet ribbon | Care instructions: N/A
Anchorman costume for tots
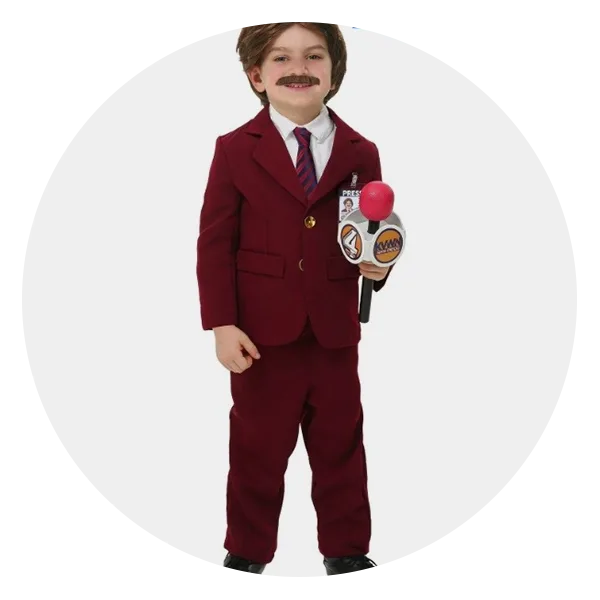
This toddler Halloween costume is sort of a big deal. In this twill suit, tie, wig, mustache and press badge, your little one will look just like Will Ferrell in the beloved movie Anchorman. How cute!
Size range: 18 months to 4 years | Material: 100% polyester | Care instructions: N/A
’80s workout costume for tots
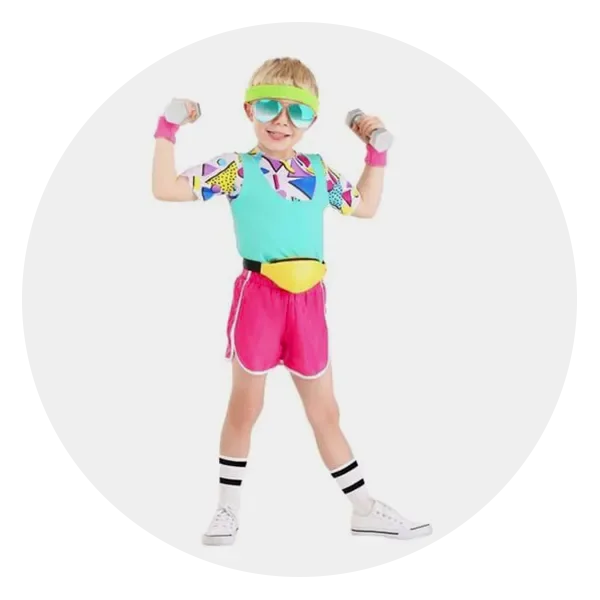
Your child may not have lived through the ‘80s work out wave, but that doesn’t mean they can’t get in on all the radical neon fun! This cheeky Work It Out ‘80s costume will bring on the giggles and allow you and your child to make up a silly character that will get everyone pumped up! They may even want to wear these clothes after Halloween—after all, they do have a very distinct toddler vibe!
Size range: 18 months to 2 years | Material: 100% polyester (shirt & shorts); 95% polyester/5% spandex (tank top) | Care instructions: N/A
Classic storybook character toddler costume

Let your toddler become one of everyone’s favorite storybook characters and this Halloween is sure to be an adventure that they’ll never forget. Everyone will delight in seeing Max out in the wild, and your little one will stay nice and warm all night in this adorably cozy costume.
Size range: 6-12 months to 4 years | Material: Polyester | Care instructions: Spot clean as needed
Ace ventura pet detective halloween costume
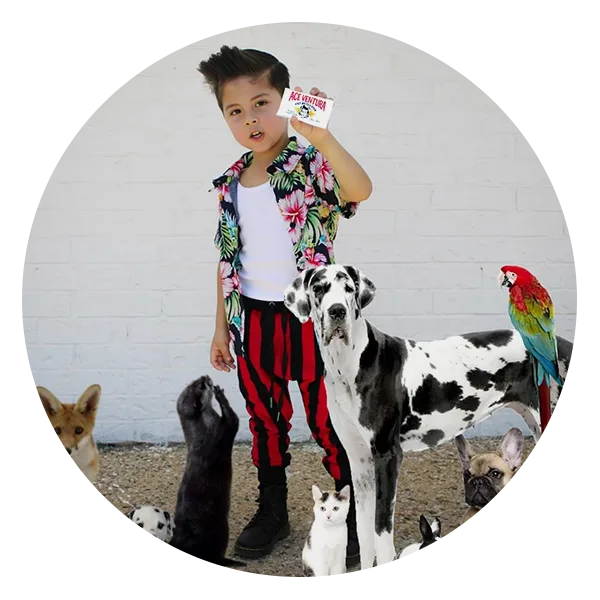
On the hunt for funny toddler Halloween costumes? We’ve got just the one for you. Dress your tot as Ace Ventura, Pet Detective, and let your mini Jim Carrey have a ball.
Size range: 6-12 months to 7 years | Material: 100% polyester | Care instructions: Machine wash, tumble dry
Dragon halloween costume for toddlers

Fly high with this winged toddler costume. The onesie’s got shiny scales, spiked wings and a hood with “sharp”—okay, very soft—horns. It would be perfect for a House of Dragons-themed family costume.
Size range: 6 months to 4 years | Material: 100% cotton | Care instructions: Hand wash only
Fuzzy monkey halloween costume for toddlers

We bet you’re used to your kid monkeying around. They’ll look the part in this super-soft jumpsuit and hood, which features an adorable monkey head, tail and non-skid feet.
Size range: 6-12 months to 5-7 years | Material: 100% polyester | Care instructions: N/A
Bumblebee outfit for halloween

Among the cute Halloween costumes for toddler boys and girls, this bee outfit will create quite the buzz. It features a soft, faux-fur bumble bee bodysuit with a hood, antennae and booties. Whether you’re searching for an 18-month- or a 2-year-old Halloween costume, this pick’s multiple sizing options has got you covered.
Size range: 18 months to 4 years | Material: 100% polyester | Care instructions: N/A
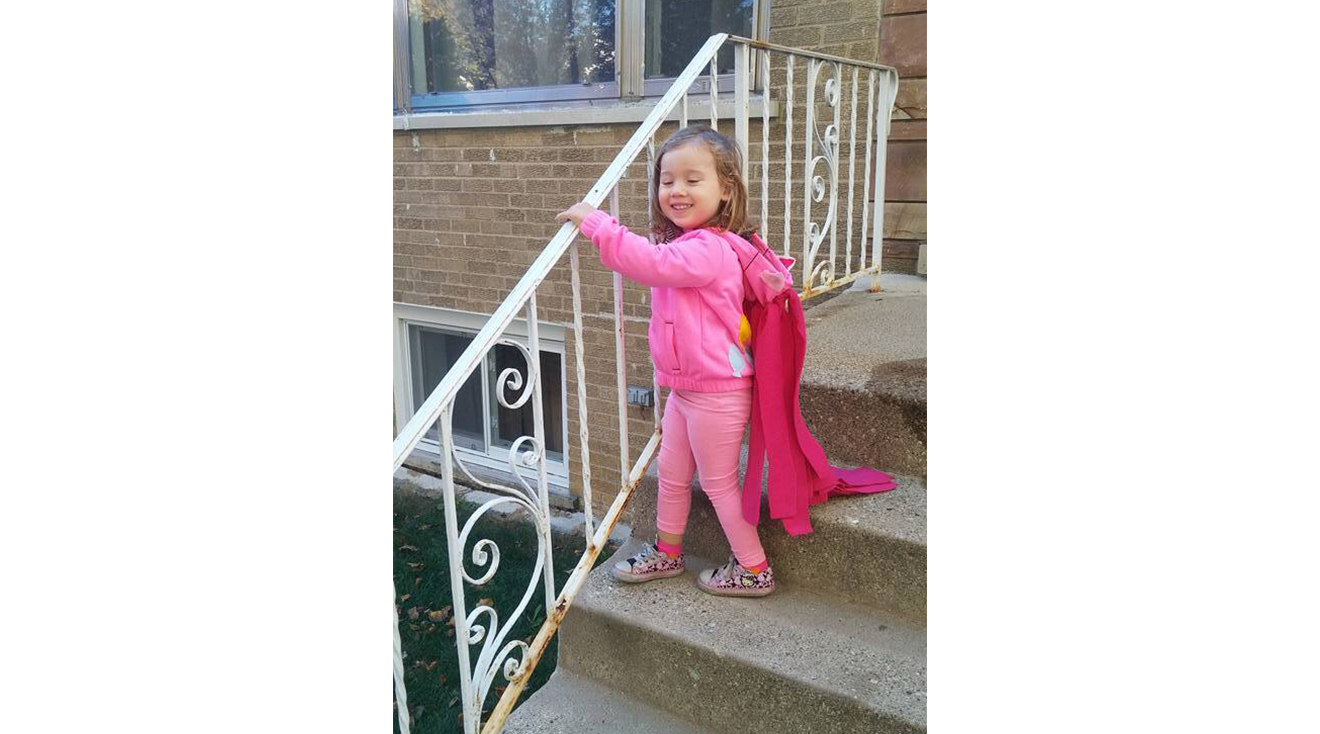
Toddler superhero costume
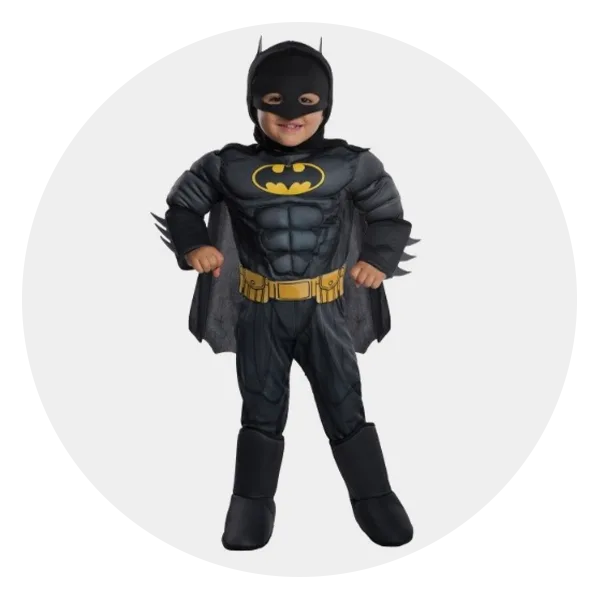
On the hunt for a toddler superhero costume? If cuteness is a weapon, then Gotham City is safe with your tot in this classic costume, complete with a cape and mask. And you can rest assured your little Batman super-fan will be getting a lot of wear out of this outfit beyond October 31st!
Size range: Toddler, 2T and S | Material: 100% polyester | Care instructions: N/A
Cozy dalmatian jumpsuit for toddlers

If you’re looking for cute toddler Halloween costumes, a precious little puppy is a foolproof option! This soft Dalmatian outfit will keep them comfy from head to toe for all of the spooky festivities.
Size range: 12 months to 4 years | Material: 100% polyester faux fur | Care instructions: N/A
Cute Abby Cadabby fairy costume

Your little one is sure to cast a spell dressed as everyone’s favorite Sesame Street fairy. With sweet details, like a crushed velvet top, sparkly wings and a headband resembling Abby’s signature pigtails, they’ll be ready to make some magic on Halloween.
Size range: 12-18 months to 4-6 years | Material: 100% polyester (costume); 100% nylon (wings and overlay) | Care instructions: Hand wash, line dry
Pink barbie costume

If you happen to have a toddler who only wants to wear pink, they will love dressing up as the iconic Barbie doll. All parents need to do is wear the trendy color too, et voilà, family costume!
Size range: 2 years to 5-6 years | Material: Polyester | Care instructions: Spot clean
Toddler lion costume
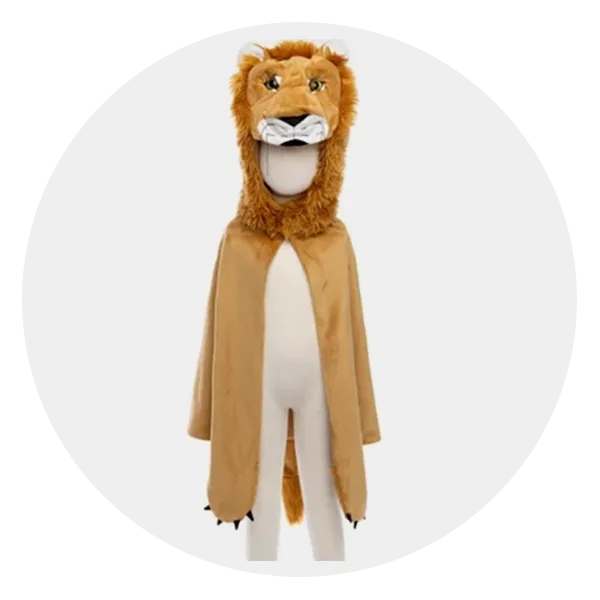
Let your child be the king of the jungle with this gorgeous, handcrafted lion cape! The attention to detail here goes above and beyond your average kid’s Halloween costume, and its high quality will ensure it’ll live in your family’s costume box for years to come. The cape is also easy to put on and will allow for warm clothes underneath without sacrificing style!
Size range: 2-3 years to 4-6 years | Material: 100% polyester | Care instructions: Machine wash, line dry
Toddler Cocomelon costume
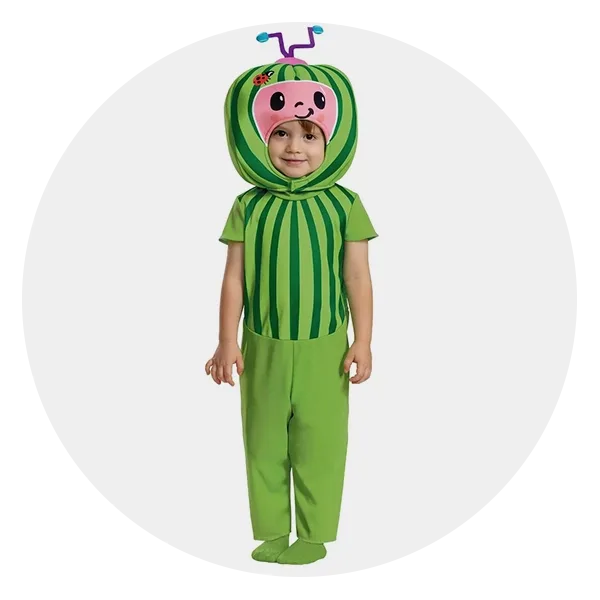
Is your tot obsessed with Cocomelon? Then this costume will make them feel like they’re part of their favorite TV show. This funny toddler Halloween costume’s soft jumpsuit and foam watermelon headpiece will make your kiddo look like one-in-a-melon.
Size range: 6-12 months to 3-4 years | Material: 100% polyester | Care instructions: N/A
Skeleton toddler costume
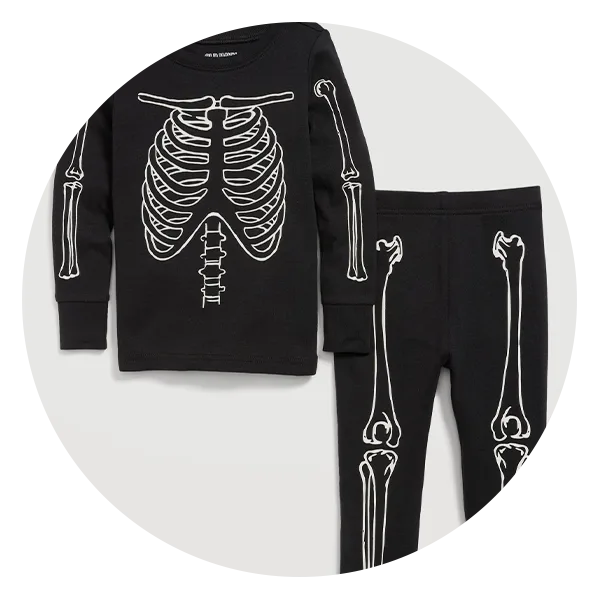
This pajama set is great for parents looking for something cozy and versatile. You can never go wrong with a classic skeleton costume—it's the perfect combo of comfy and spooky! Your child will be able to wear this cute outfit while they trick-or-treat, cuddle on the couch or during playtime. Plus, it's 100 percent cotton and can be easily tossed in the washing machine after preschool parties and trick or treating.
Size range: 6-12 months to 6 years | Material: Cotton | Care instructions: Machine wash, tumble dry
Toddler cow costume
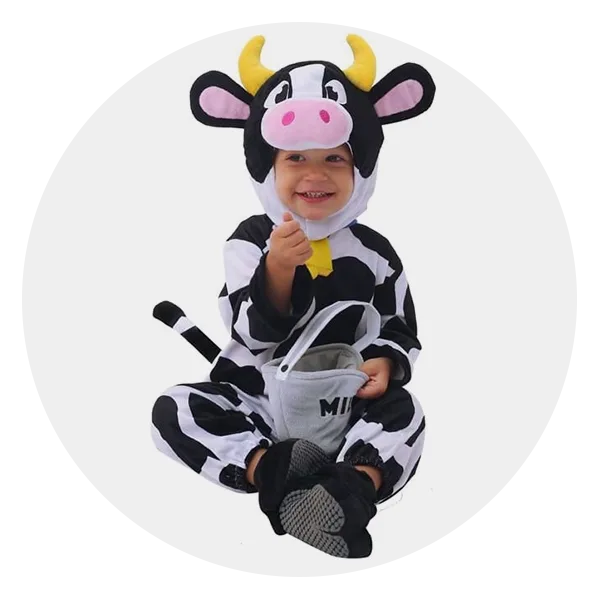
Though your kiddo may have moo-d swings, we know you still love them to bits. And with this cute toddler Halloween costume on, you can bet they’ll look udder-ly adorable as you trick-or-treat around your neighborhood.
Size range: 12-18 months to 18-24 months | Material: 100% polyester | Care instructions: N/A
Cute pumpkin toddler halloween costume
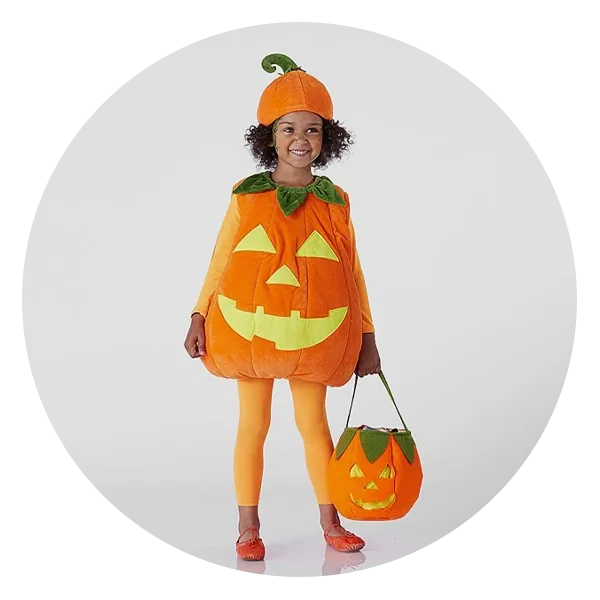
Stick to the classics with this adorably oversized pumpkin outfit, available in toddler sizes 2T and up. The body glows in the dark, and the adorable pumpkin hat will set it apart from other squashes on the street.
Size range: 2 years to 7-8 years | Material: 100% polyester | Care instructions: Spot clean with a damp, white cloth. Blot to remove excess water. Air dry.
Creative crayon costume for toddlers

In honor of the newly-released Harold and the Purple Crayon, why not dress your little one as a box of crayons? Even if you’re not a fan of the movie, this creative toddler Halloween costume is perfect for kiddos who love to draw.
Size range: 2 to 4 years | Material: Polyester | Care instructions: Spot clean
Cute donut costume for tots
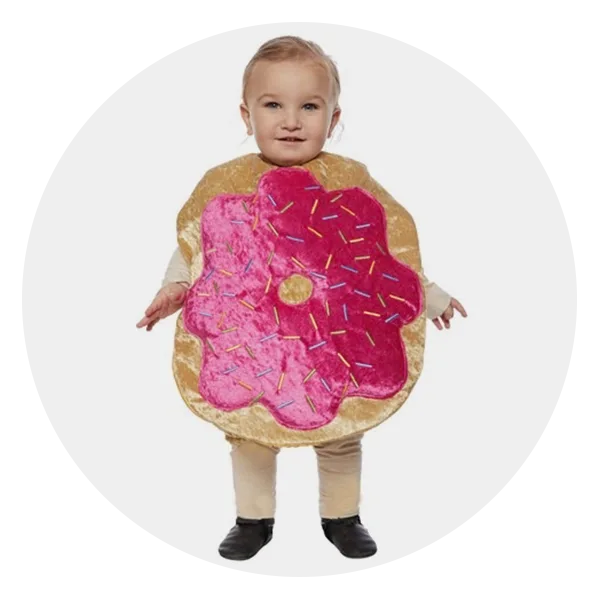
Halloween is all about sweet treats, so why not celebrate the occasion by dressing up your tot in this donut outfit? The toddler costume easily slides on and off for your convenience and your child’s comfort. And if October 31st ends up being extra chilly, no problem; just dress your trick-or-treater in snuggly layers underneath.
Size range: 18-24 months to 4-6 years | Material: 100% polyester | Care instructions: N/A
Toddler astronaut costume
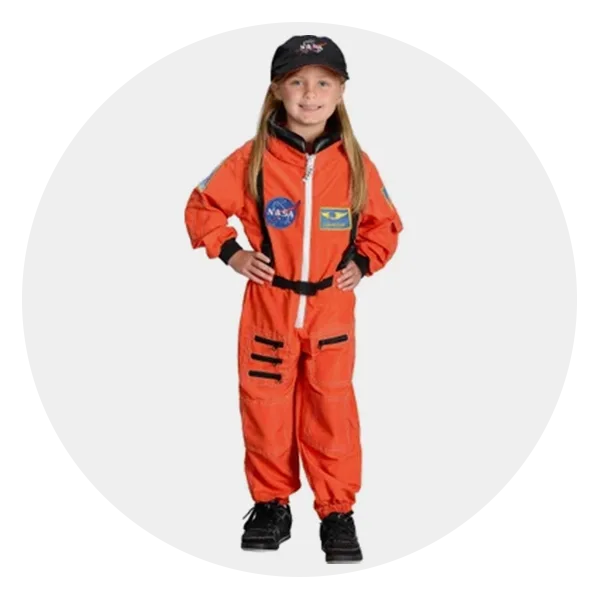
Your kid will be reaching for the stars thanks to this fun toddler Halloween costume. The realistic suit features official NASA patches and a cap, so your toddler will look like the real deal. Plus, for little ones still wearing diapers, the jumpsuit features inseam snaps for easy changes.
Size range: 18 months to 12-14 years | Material: N/A | Care instructions: Machine wash, tumble dry
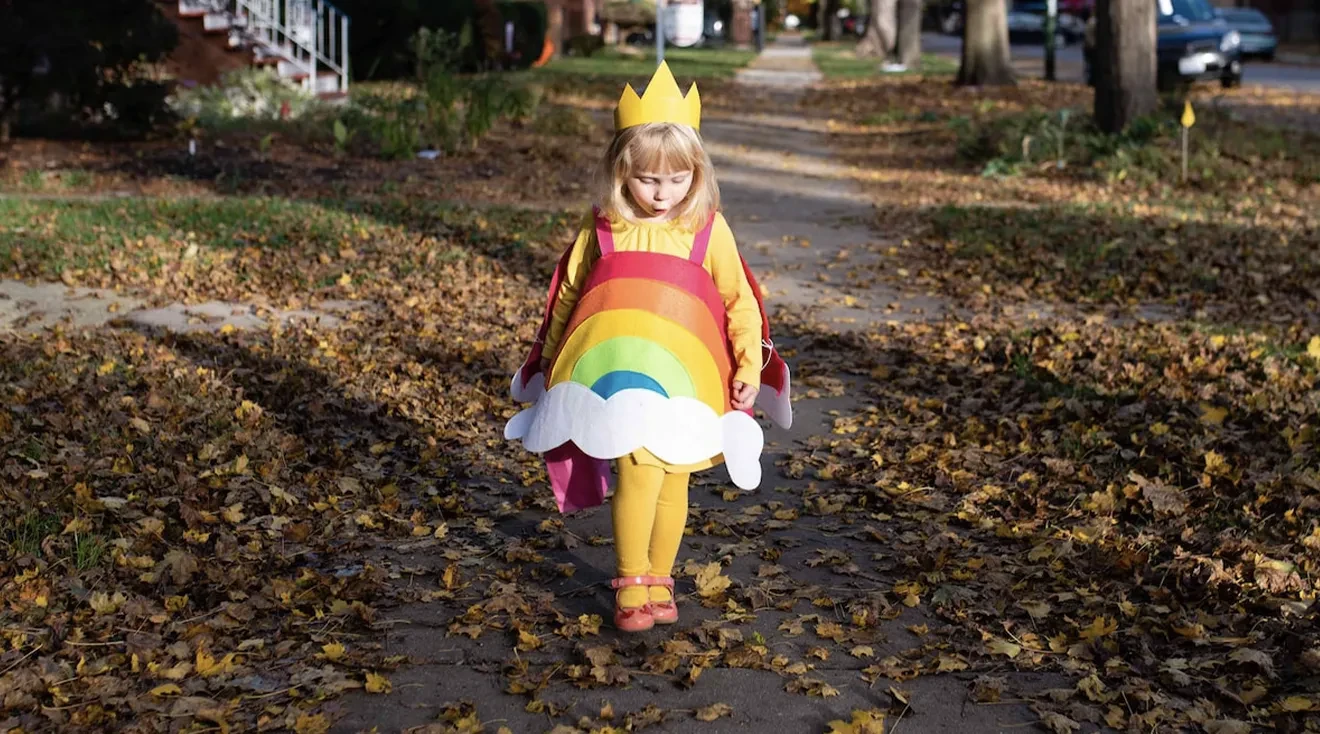
Rainbow halloween outfit for toddlers
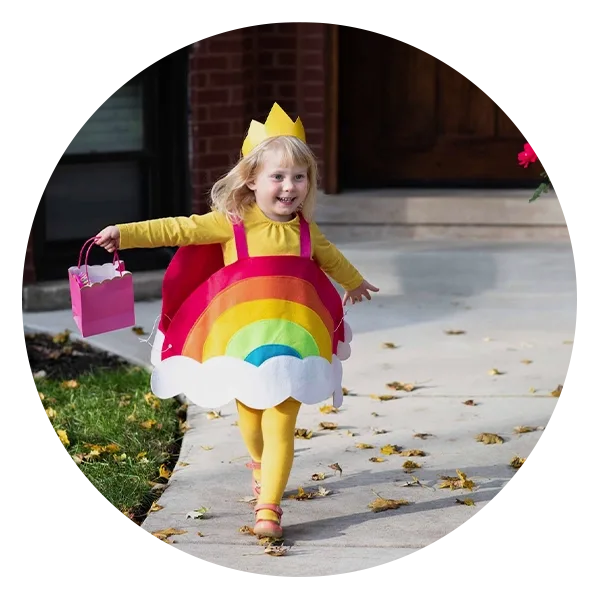
You can’t always make your toddler smile (we know those tantrums all too well), but they’ll still light up everybody’s life in this sunshine-y, sweet rainbow costume.
Size range: One size | Material: Felt | Care instructions: N/A
Penguin costume for toddlers

If your tot has happy feet, this penguin costume is a perfect fit. Just picture your little one waddling around in this bodysuit!
Size range: 2 years to 4 years | Material: 100% polyester | Care instructions: N/A
Vampire costume for tots

This next pick on our list of the best toddler Halloween costumes is ideal for kiddos who are 50 percent sugar and 50 percent spice. The spooky yet glamorous lace costume features a dramatic collar and necklace that your little vampire is sure to love. We can’t think of a better toddler girl Halloween costume out there!
Size range: 3-4 years | Material: Polyester | Care instructions: N/A
Cute toddler ghost costume

The best toddler costumes are fun, modern twists on traditional Halloween outfits. This smiley spirit is an easy-to-wear poncho that will have your tot twirling for the camera. Simply pair it with a white shirt and leggings for a spooktacular look.
Size range: 9-12 months to 5-6 years | Material: Cotton blend | Care instructions: Hand wash
Mummy outfit for tots
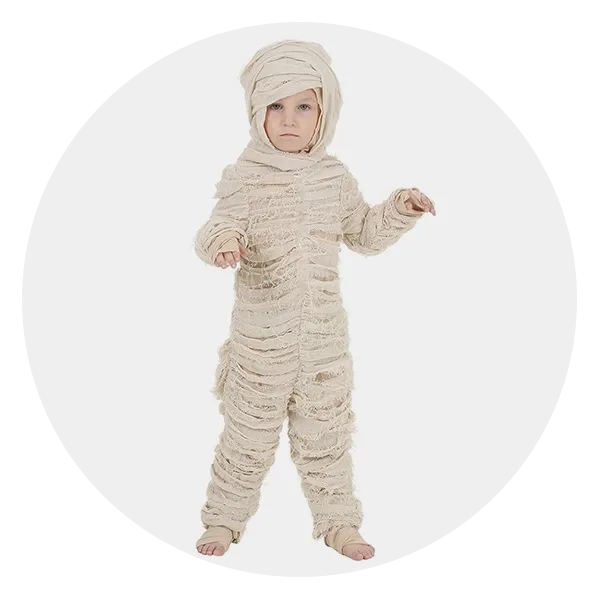
Want to dress your tot in a classic costume this Halloween? This costume for toddlers has definitely stood the test of time! Plus, the gauzy strips on this outfit are sewn onto a zippered jumpsuit so they won’t fall off as your little mummy celebrates.
Size range:* 18 months to 4 years | Material: 100% polyester (main body); 93% cotton/7% rayon (decorations) | Care instructions: N/A
Unicorn toddler costume

Add a touch of sparkle to your Halloween celebrations with this cute unicorn costume. The outfit includes a rainbow tulle tail and a headdress complete with a horn and a flowing mane.
Size range:* 3 to 6 years | Material: Cotton, velvet and tulle | Care instructions: N/A
Baby Yoda toddler costume

Dress your child as “The Child”—aka Grogu from the Star Wars universe. This two piece costume for toddlers includes a headpiece and a bodysuit with an attached hover pram.
Size range:* 2 to 5 years | Material: Polyester | Care instructions: N/A
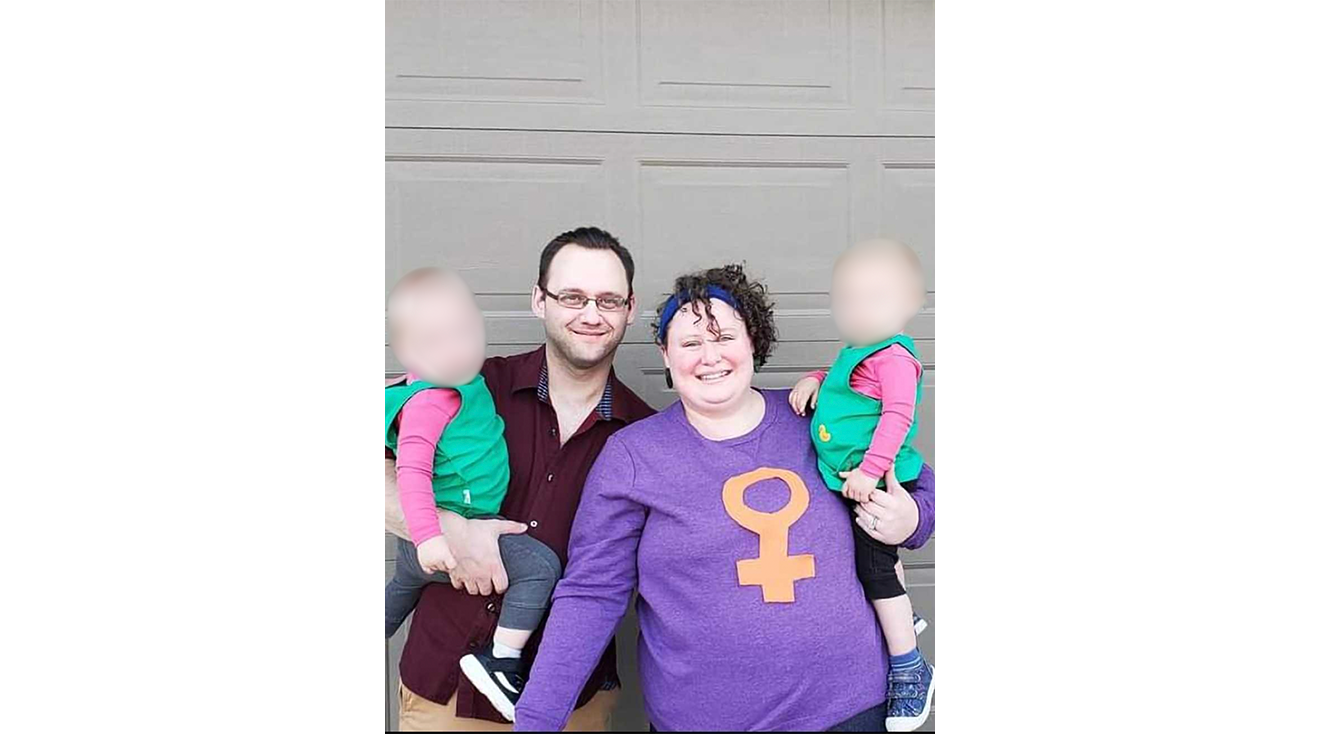
My Little Pony costume
Whether your little one is loving Chappell Roan or My Little Pony, this pink pony costume is sure to go down a storm. “My daughter was obsessed with My Little Pony as a toddler,” says father of one Daniel. “I taught myself to sew, so I could get a mane and a cutie mark onto a pink hoodie at her request,” he reminisced. Talk about a devoted dad!
Rugrats costume for twins
Mom of two Kathy shared that she dressed her toddlers as Phil and Lil from the iconic cartoon Rugrats. “It’s pretty much REQUIRED to do it when you have boy/girl twins,” explains Kathy. Bonus points for the adult costumes that totally match the theme!
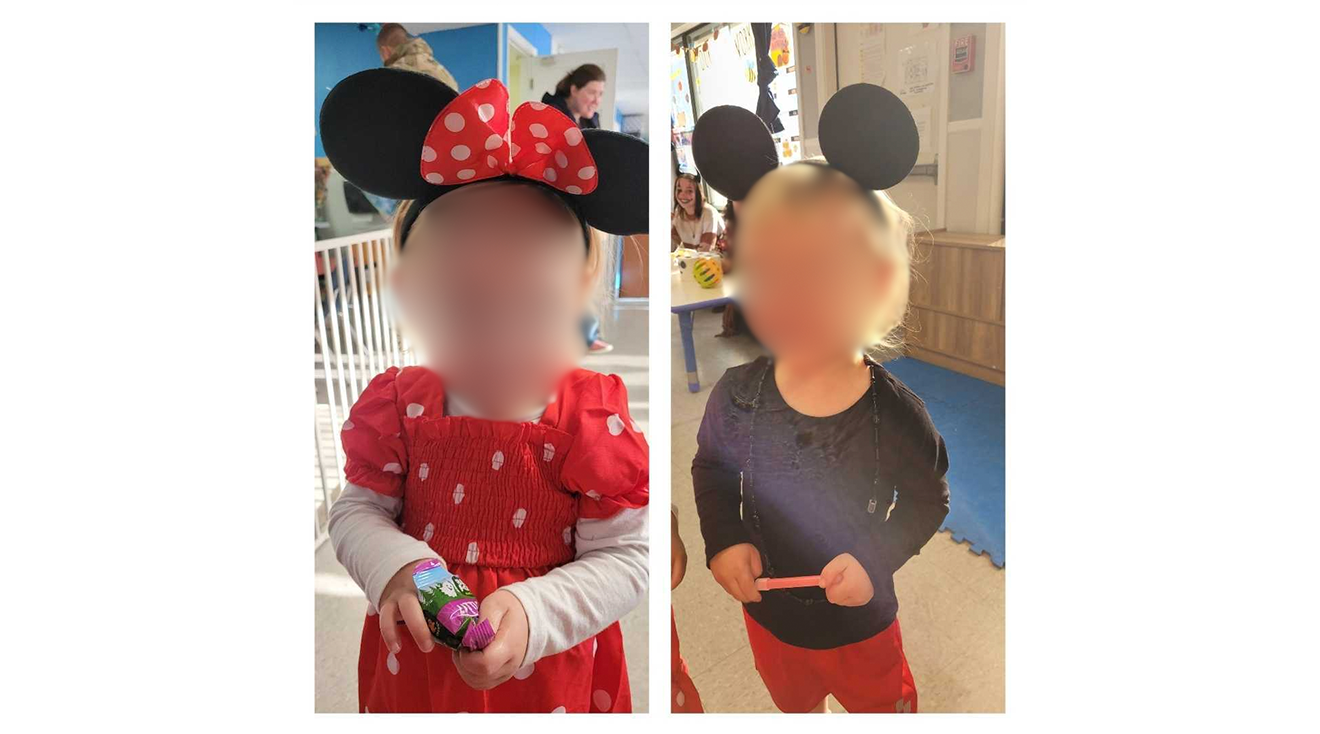
Minnie and Mickey Mouse costume
“Last year, they were Minnie and Mickey,” says Kathy who shared this adorable snapshot of her twins dressed up for their third Halloween celebration.

Chuckie costume
Looking for a truly scary toddler costume? “On my son’s second Halloween we took advantage of one of the last times he wouldn’t have a true opinion and made him Chuckie,” says mom of two, Lauren. She went on to say that he’s been a superhero for every Halloween since, but that this iconic horror costume is one of her favorites to date.
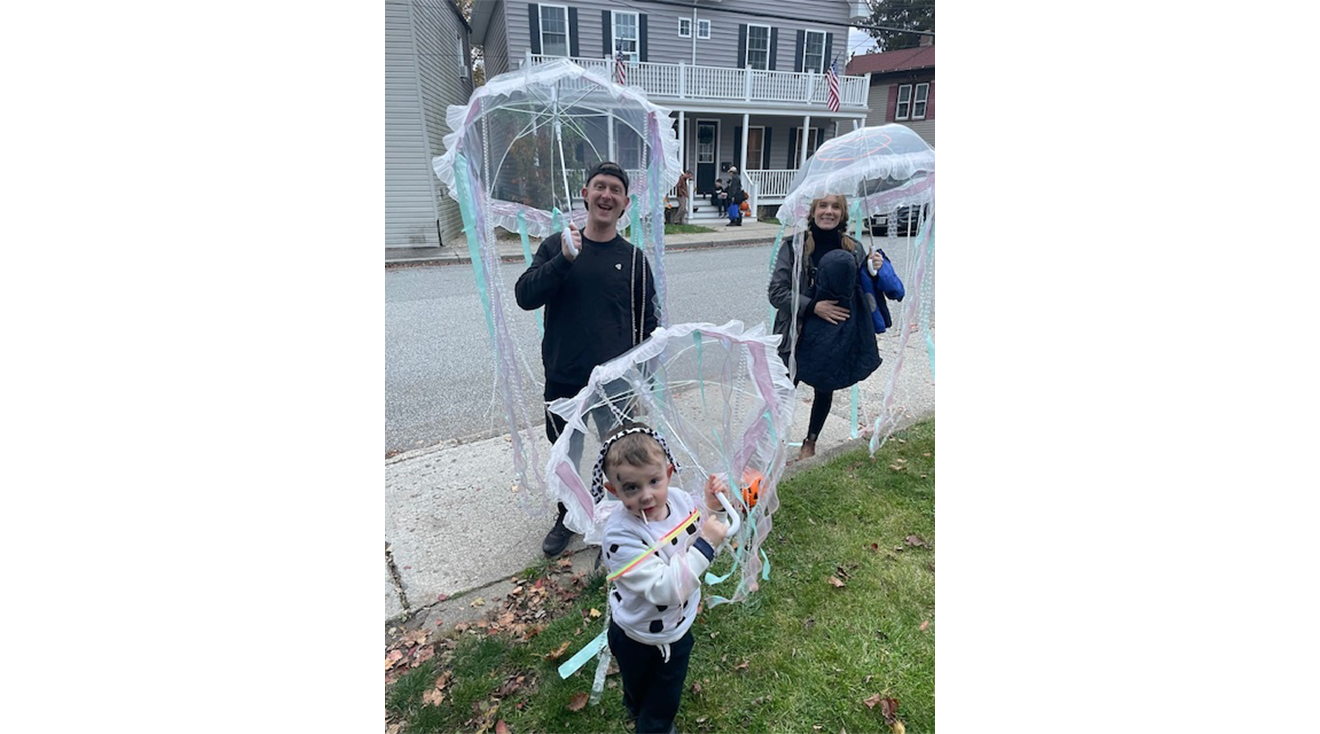
Jellyfish family costume
Why not draw inspiration from the deep blue sea? “I’m really proud of the DIY jellyfish family costume we created last year,” says mom of two, Kate. “I definitely don’t recommend a toddler costume with a prop they need to carry—lesson learned. But they looked super cute anyway,” she added. And in case you were wondering, her son is also wearing the Dalmatian costume that his daycare class made as a group. Two looks in one? We’re here for it.
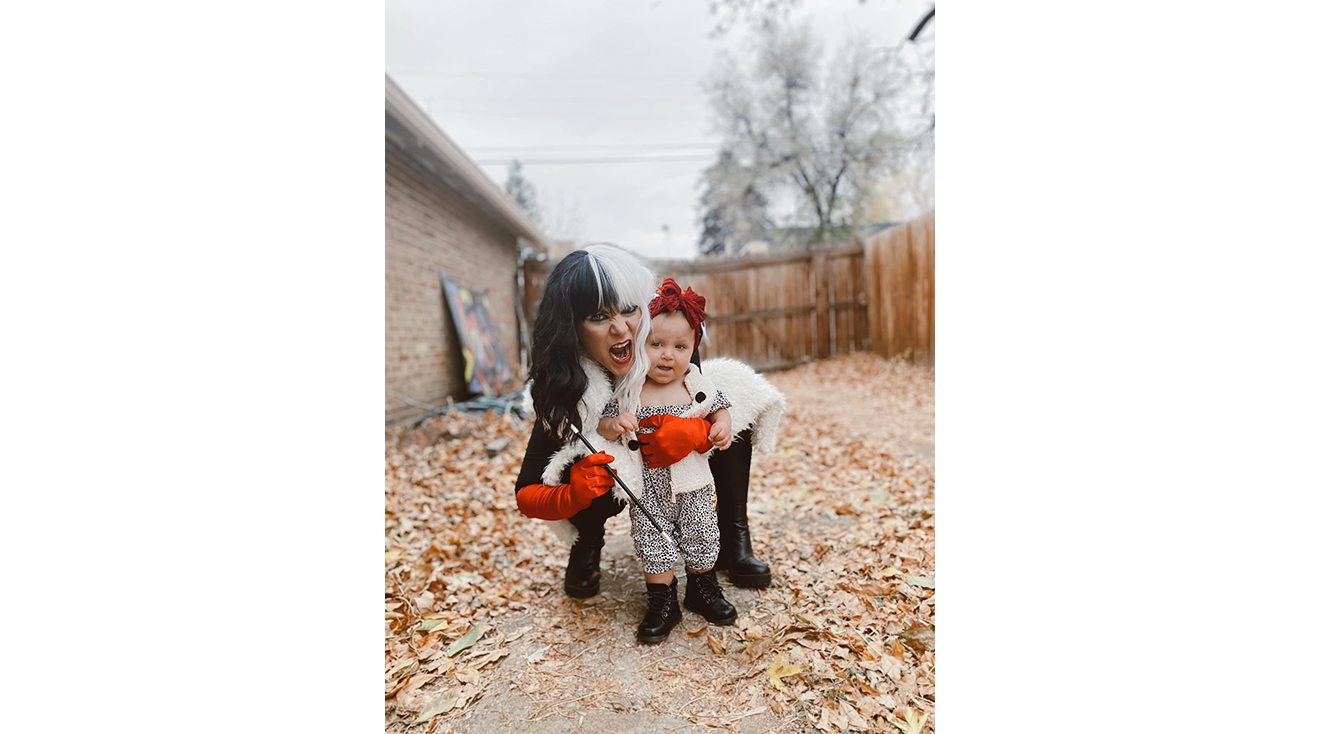
Cruella de Vil and dalmatian costume
In 2021, Jody and her daughter were Cruella and a dalmatian. She added that it was “all DIY and so much fun!”
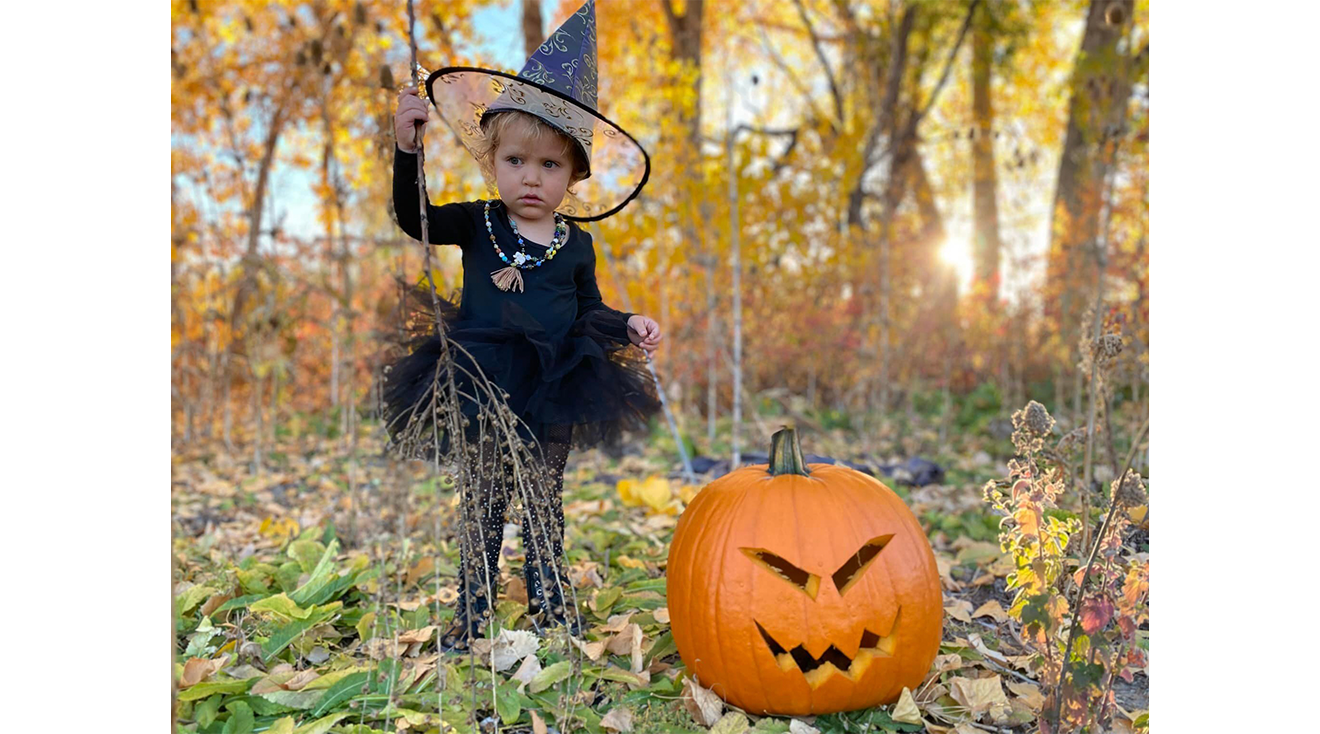
Witch costume
For her second Halloween celebration, Jody’s daughter was “adamant on being a witch.” According to Jody, “her witch costume was a hit, and so easy to DIY.” Goes to show you just can’t beat the classics.
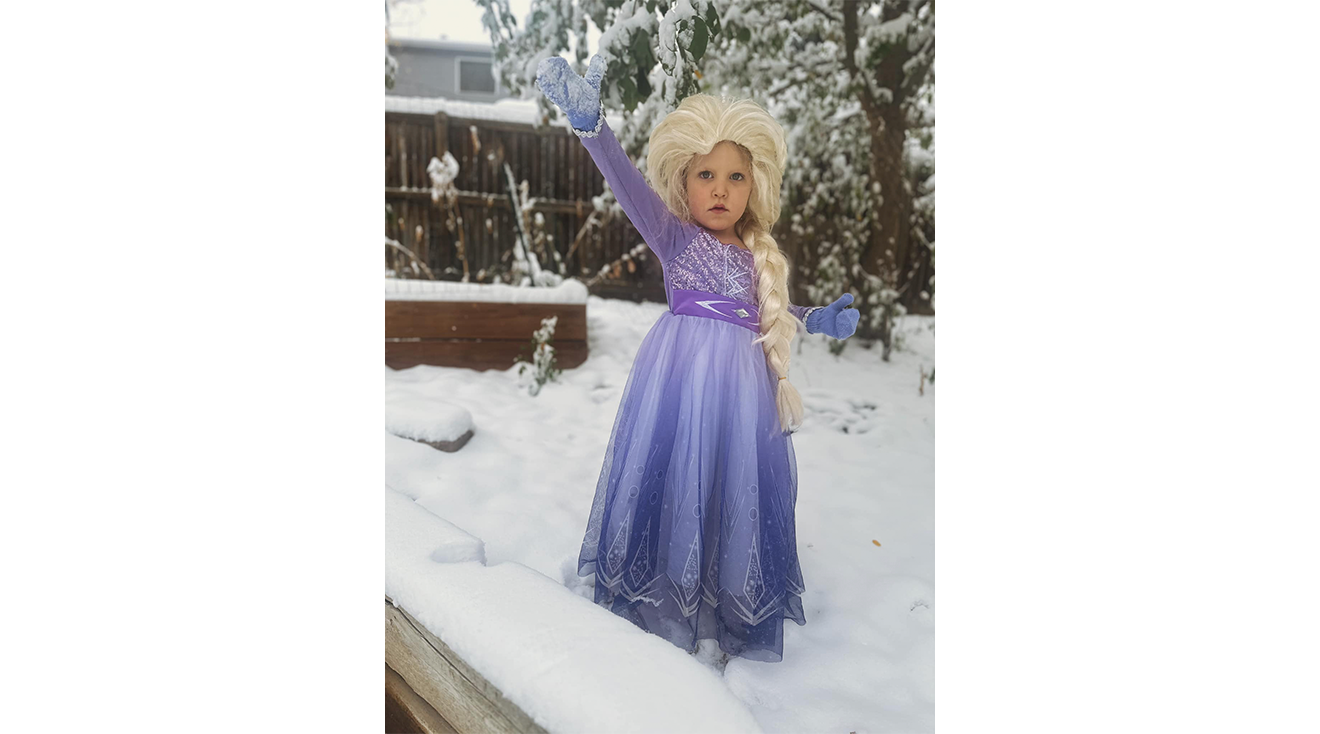
Elsa costume with a twist
Why not make an iconic character your own? After all, Halloween is all about being creative and pushing boundaries. “Last year she was Elsa but with her own special spin on it because she loves purple,” says Jody who shared this super-cute Frozen costume idea with us.

Minion costume
This Despicable Me costume is one for all the family. “My husband was Gru, I was Dr. Nefario and my daughter was a minion,” explains mom of one Jessie. Assemble the minions!
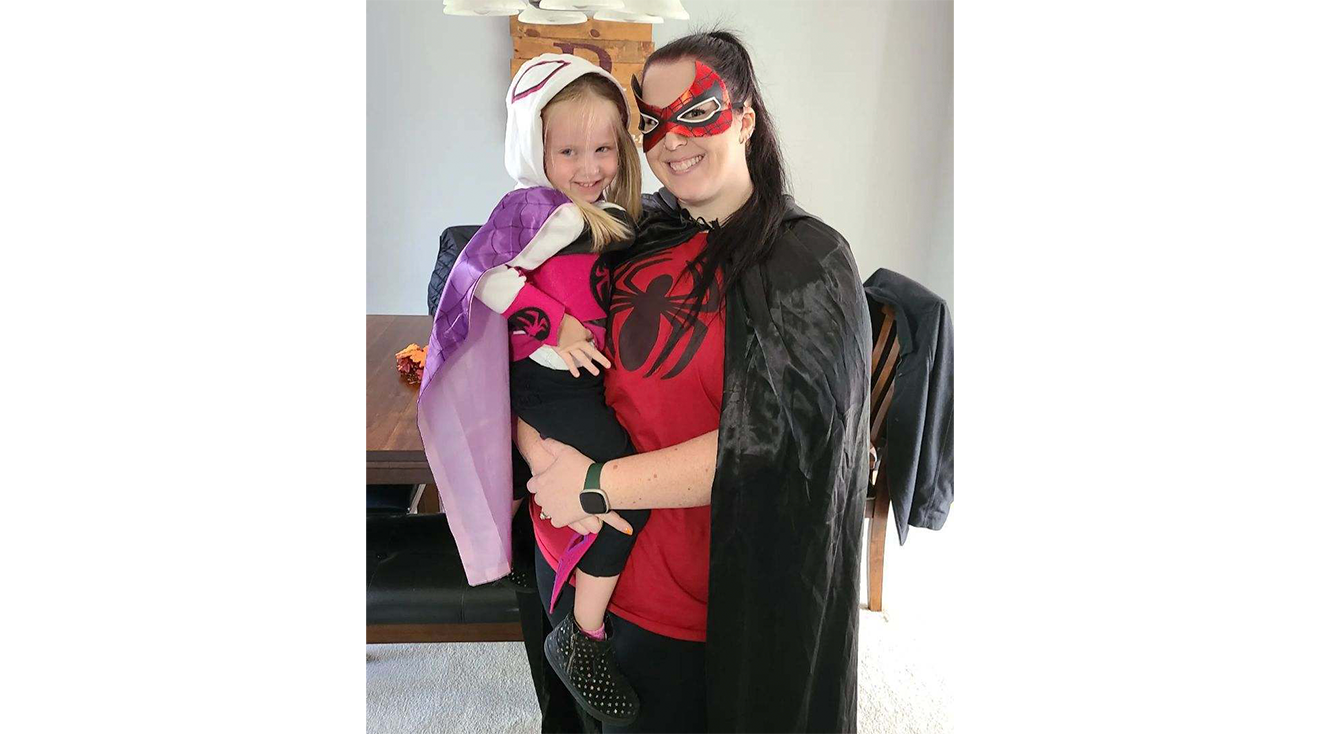
Spider-Verse costume
Pay tribute to *Spidey and his Amazing Friends” with this cute coordinated Halloween costume. “I was Spin and my daughter was Ghost Spider,” explains Jessie.
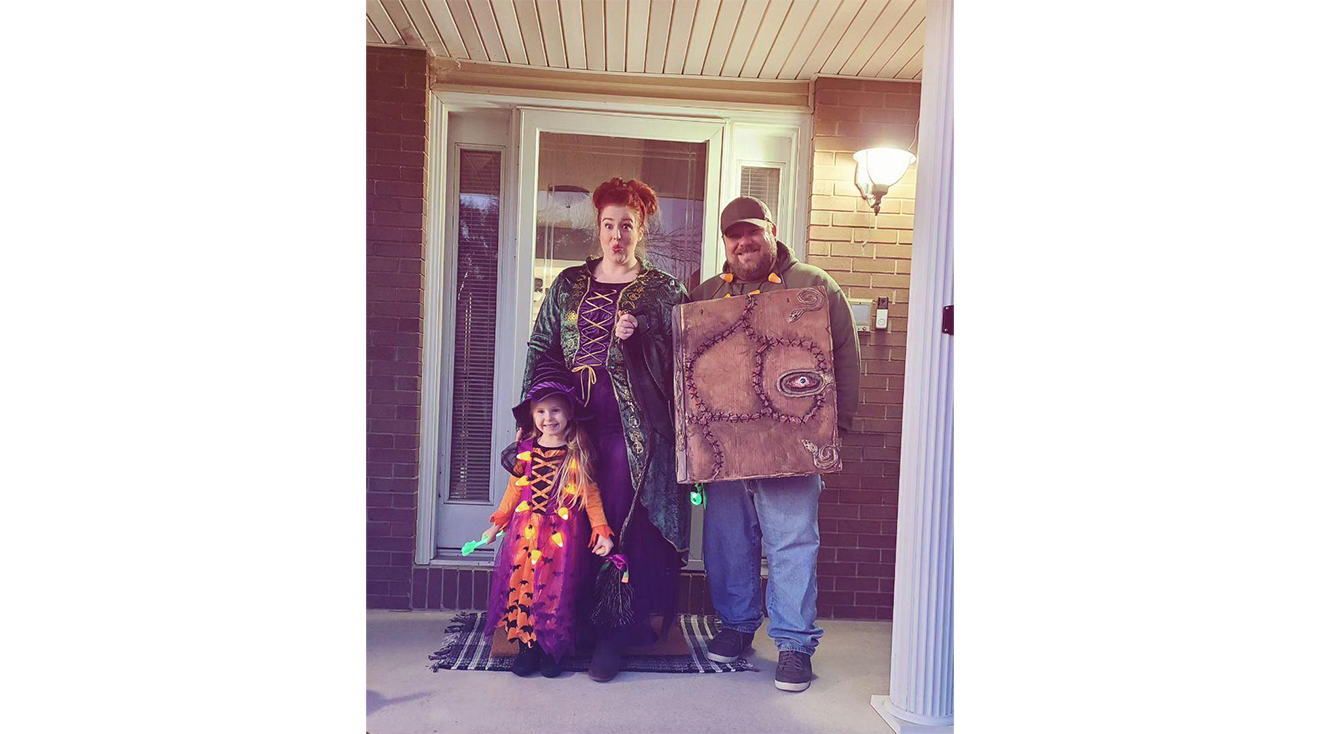
Hocus Pocus family costume
Jessie’s favorite Halloween costume to date was this incredible Hocus Pocus inspired look. “I was Winnie, my husband was Book (which he made himself!) and my daughter was Dani, which, fun fact, is also her actual name.” This pick has certainly put a spell on us!
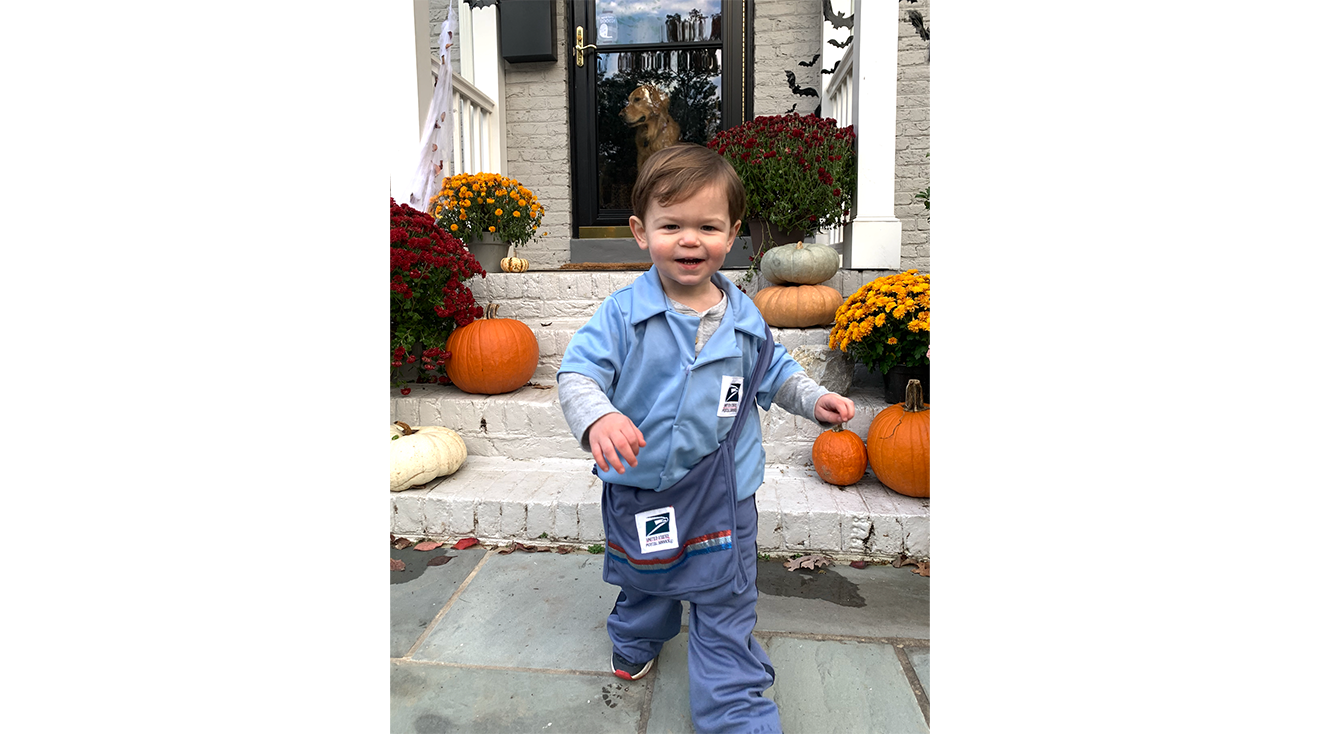
Mail man costume
This toddler costume was a big hit back when Catherine’s son was in his “mail man obsession era.” Who knew something so simple could be so cute?
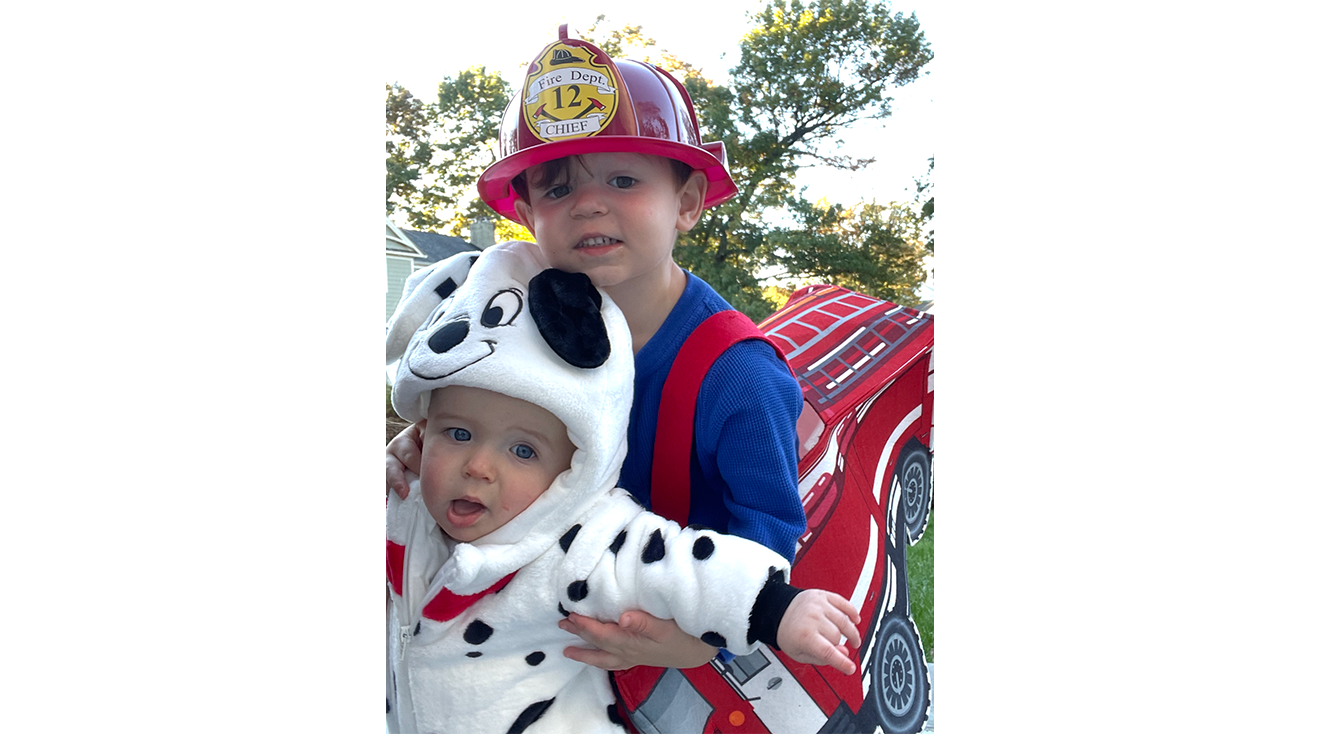
Firefighter and dalmatian costume
The following year, “little bro entered the chat” and Catherine dressed her eldest as a firefighter (complete with firetruck) while her little one hitched a ride as his loyal dalmatian companion.

Dinosaur costume
In 2022, Catherine’s sons ruled the block dressed as two fearsome dinosaurs. “Thankfully we had a back up for my oldest since the inflatable /[dinosaur costume] did pop,” adds Catherine.
About the writer: Martina Garvey is an editor at The Bump, where she writes and edits e-commerce content for pregnancy, postpartum and parenting. Over an eight-year career in educational publishing and digital media, Martina has developed a keen eye for detail and robust reporting skills. As a staff member on The Bump for over three years, she leverages an in-depth knowledge of must-have baby gear and postpartum essentials alongside a passion for the latest trends to create informative content parents can trust.
Plus, more from The Bump:
Navigate forward to interact with the calendar and select a date. Press the question mark key to get the keyboard shortcuts for changing dates.